Easy visible mending with sequins
I first came across Lisa Bennett’s wonderful In the Making aprons a few years ago now when researching for a blog post. I’d spent hours trawling to pick out the very best workwear aprons to share with my readers… and was feeling a touch jaded by the time I happened upon one of her designs. It was a sturdy little number crafted from striped denim with bright red straps that crossed over the back and it stopped me in my tracks. I love those moments. It’s partly the thrill of the chase for me – and also excitement at the prospect of sharing my findings with you.
Turns out, Lisa hand crafts the most beautiful collection of workwear aprons, specifically designed for artists, makers and potters and as soon as I’d shared my findings with my readers, it was obvious from their response that they loved them too.
Lisa and I have collaborated very happily ever since and were recently chatting about the subject of mending clothes. I mentioned I’d had a (not entirely successful) attempt at mending a much-loved cardigan and Lisa casually dropped in that she’d been experimenting with visible mending. Using sequins, sometimes giant sequins, in clever ways. She had me at ‘giant sequins’ and I knew I had to share her ideas with you. Lisa has very kindly shared her tips and step by steps for repairing damaged and worn old knitwear or fabric in three different – wonderfully spangly – ways. I hope you love the idea of visible mending with sequins as much as I do!
Lisa’s tips and ideas for easy visible mending
The environmental impact of the fashion industry (not to mention working conditions) needs to be corrected, as Laura says on her FBWL welcome page: “it’s about buying less but buying better and buying close to home”. We need to cherish our clothes and home textiles, extending their life with good care, mending and re-purposing.
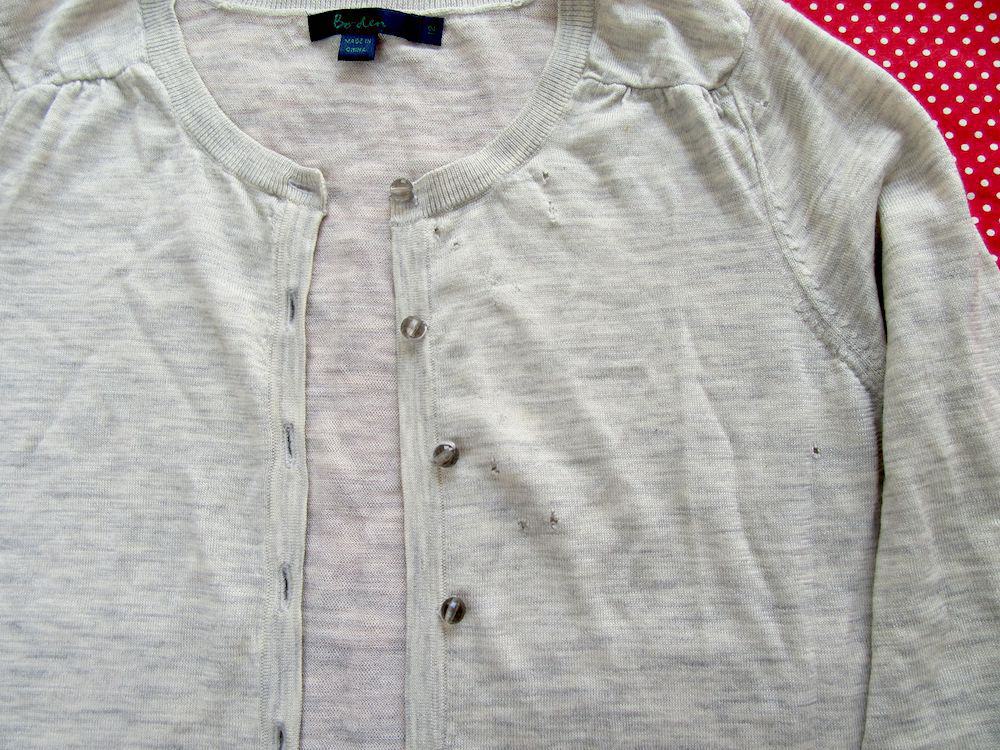
This year two of my favourite cardigans emerged from Winter storage full of moth holes. In years gone by, at least one of them would have been binned. Now I see the damage as a challenge, to think of ways to prolong their life.
I decided to disguise the damage with little clusters of sequins, and in the process give them a really unique and personal touch. I came up with three different ways to use them – applicable to different types of damage. There’s clusters of sequins to repair scattered damage, small ‘patches’ to repair tears or larger moth holes and sampler ‘blocks’ to repair larger areas of wear. There’s a creativity to visible mending that I love – I hope you do too!
Easy visible mending
You will need
- A needle
- thread to match your jumper or item of clothing
- thread to sew sequins (matching or contrast)
- pins
- a few sequins (see the end of this post for links to where I buy my sequins)
First thing to do with a holey/moth damaged jumper is to kill off any potential moth eggs to prevent further damage. Best way to do this is to seal the jumper in a bag and place in the freezer for a couple of days and continue to store in a bag).
How to disguise scattered moth holes

Using matching thread, working on the back of the jumper, carefully pick up the knitted stitches (2 or 3 at a time) all around the hole.


Squeeze the hole together with your fingers and stitch through the knitting, poking the needle through from the front and then back again from behind with small stitches, making a little seam. It might look a bit puckered at this stage, but it will look better when it’s lightly pressed with the iron (and completely hidden behind sequins!!)
Mark the location of each hole by sewing a couple of loops of contrast thread next to them.

On the right side, arrange the sequins over the stitched holes in patterns or sprinkle to help give a random effect – don’t be afraid to overlap them. Use your phone to photograph the sequin arrangement as reference, in case the sequins move or fall off whilst you’re stitching. I pinned my sequins in place, but you have to take care that the thread doesn’t get caught up in them.

Using your chosen thread sew the sequins in place bringing the needle up through the sequin hole over the sequin and down over the edge into the fabric, then up through the hole again, making enough stitches to secure the sequin and create a pattern. The sequins I use have off-centre holes, so my stitches were in an asymmetrical pattern.


Here’s the finished result, carefully pressed to reduce any puckering. I think I actually prefer it now to the original – totally unique and more interesting. Instead of throwing it away, I’ll wear it for years to come!

How to make a sequin ‘patch’ to repair a tear or large moth hole

The damage to my green cardigan was confined to the bottom corner of the opening edge – my instinct was to echo the right angle shape in a neat rectangular block of sequins. The cardigan is such a beautiful green, I wanted to continue that colour theme in the sequin selection, along with lovely balancing tones.
As a designer I use colour theory ‘complementary colours’ to help develop colour combinations. Here I chose to go with greens and pinks, with blue/green and yellow/green in the mix to avoid being too formulaic or predictable.

I first of all pulled the hole edges together in the same way as before, before marking out a rectangle shape using a ruler and pins. The sequins were sewn around the 4 sides first as a border, then, starting from the left top corner I filled in the middle with columns of sequins.


Here’s the finished repair. I love how it looks – not pretending to be anything other than a visible mend – albeit a pretty, spangly one!
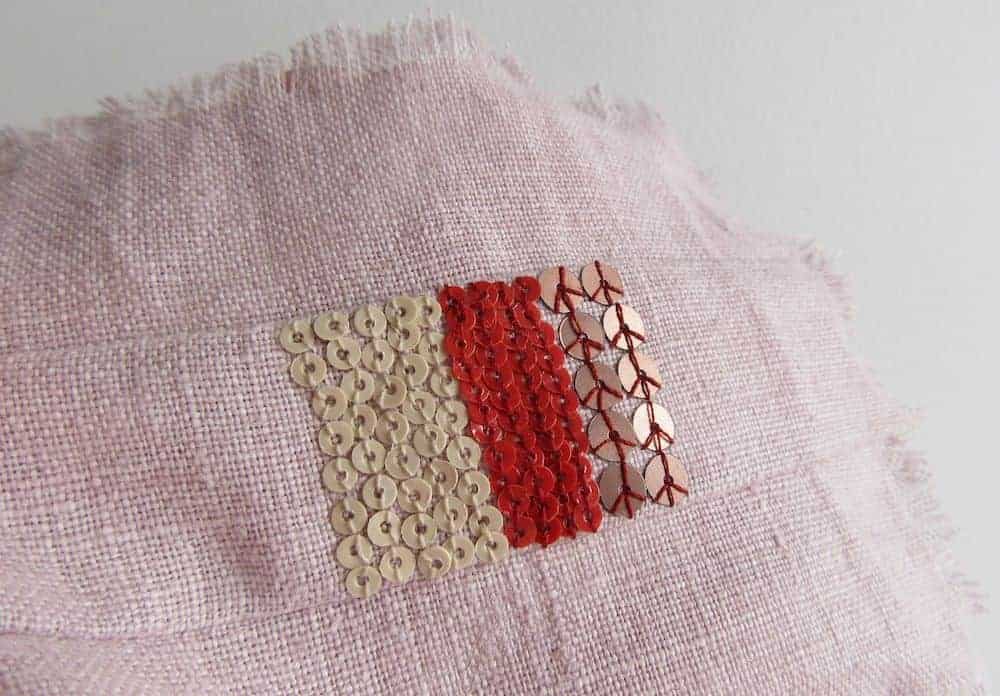
How to make a sequin sampler ‘block’ to repair areas of wear on fabric

I so enjoyed the two cardigan repair projects that I decided to play about a bit more with size and colour. This sampler idea would be perfect for creating patches to repair areas of wear on fabric. I’ve used thread colour to match and contrast with the sequins – and used different sized sequins to add interest.
Below is another idea I played with, using contrasting thread sewn in different patterns around the sequins. It’s fun to play around with this, so I hope I’ve given you some ideas to get you started.

Where to buy your sequins
I bought my flat, printed sequins at The Knitting & Stitching Show a few years ago. Sequins come in all shapes, sizes and gorgeous colours not just the sparkly disco kind!
Places to buy:
The Sustainable Sequin Co on Etsy
Vintage Swarovski glass sequins from Sew & Co
You might also like:
How to make an apron dress with cross back
Love… a Japanese pinafore cross-back apron
Patchwork quilt patterns – 5 free Tilda downloads
Tilda doll patterns 5 free downloads
INFORMATION
In the Making is listed in the From Britain with Love directory
This article contains affiliate links, which means we may earn a small commission if a reader clicks through and makes a purchase. All our blog posts are independent and in no way influenced by any advertiser or commercial initiative. By clicking on an affiliate link, you accept that third-party cookies will be set.
Find more inspiring ideas in the Sewing category of the From Britain with Love blog
Are you a maker or creative course provider? Like to list with us and benefit from joining our supportive community? We’d love to hear from you. Check out the packages we offer on our Join Us page.
A PIN TO SAVE TO PINTEREST


Love the Cardi now!
Me too – I’m so glad I shared Lisa’s clever ideas here!
Oh, I love this idea! At first I thought the embellishment on the grey sweater was embroidery, another idea, but the sequins are really charming too. I’m so glad for you that you were able to salvage your gorgeous green sweater. Love that color. And to be sure, the grey too. I simply cannot have too many sweaters. This was a great post. Thank you.
So glad you enjoyed it 😊
Thanks for the inspiration:)